Stop losing your games on Split and follow our Split map strategy to outsmart the competition! Given its reputation as one of Valorant’s less favored maps, it’s only natural you’ll want to improve your gameplay and outgun your foes in Riot Games’ acclaimed tactical first-person shooter (FPS). So, let us help you!
Valorant’s map pool is vast and varied, which means that mastering them all is a daunting but rewarding task. And in our guide, we deliver pro-level strats for offense and defense on Split, spotlighting the best agents to boost your odds of emerging victorious.
Speaking of odds, you can also check out the latest Valorant betting odds over at Thunderpick.
Split Map Strategy Overview
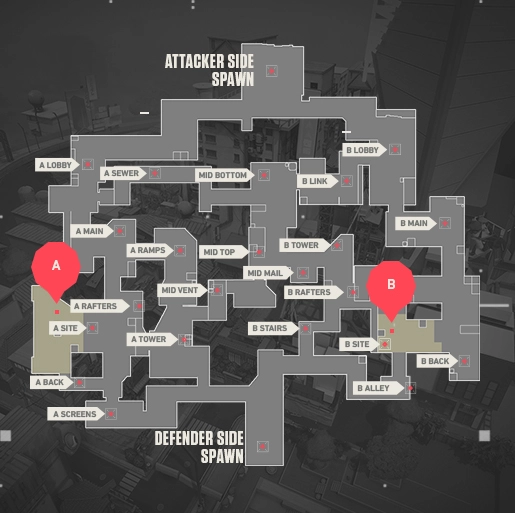
Locked in the Shinjuku district, Valorant’s Split map features two Spike sites. It was also the first map to introduce Rope Ascenders, positioned in Sewer, Vents, and B Tower. They each offer vertical advantages and swift rotations between sites.
The map is also a sniper’s paradise, with vantage points that leave Operator mains grinning. Love ambushes? Split’s got countless nooks for trap wires and alarm bots, plus corners designed for knife takedowns.
Originally considered defender-sided due to tight choke points, the Valorant 6.0 patch notes swung the pendulum and gave attackers more room to breathe and strategize. Like other maps, Split has many callouts, ranging from “A Rafters” to “B Main,” which are key to overcoming its adversities.
How To Attack On Split
Attacking on Split is about making the right moves at the right time. This Valorant map has three areas to contest: A, B, and Mid, with five choke points: B Main, Mid Mail (Heaven), Mid Vent, A Ramp (Heaven), and A Main. These points of contention are especially challenging for attackers.
Nevertheless, being victorious as an attacker on Split is within reach. Turn the tides by controlling the early game, bagging the first kill to swing the odds in your favor.
Pushing B Site
You need to control the Mid area, specifically Mail and Top, and keep A Main on lockdown. Without pressure here, defenders get too cozy. Make them sweat by securing these areas, which forces them to rotate and opens up opportunities for easy pick-offs.
Always have an agent staking out Mid, particularly for a B split push. It’s your golden ticket to two of the five choke points and keeps defenders on their toes. Storming B from B Main alone is suicide. Instead, let your squad pressure Heaven and isolate those pesky defenders.
Expect resistance around Vent and Mail, as well as a possible Sage wall across Mid. Counter these with your own utility, constantly checking your corners. Post-plant, options abound. Hold back site, push through the alley, set up lineups from B Lobby, or push through Heaven.
Each has risks, but fortune favors the bold, right? Once you nab B Site, plant at Default. Got control of Heaven too? Great! Now you should have a clear view of the Spike and all possible defuse attempts.
Pushing A Site
Mid Vent may feel like a death trap with its narrow passage, but it’s the perfect A Site decoy during a fake B Site push. For a direct A push, sprint straight into A Main from A Lobby from Spawn.
Get control of A Ramp, but watch out for defenders’ utilities and Ops perched in A Tower. When pushing A, watch your back, especially the left corner, after entering A Ramp. Made it to A Tower? Use the box as your pedestal and take out any rotating defenders.
Heading to A Site from A Main? Get ready for enemies stationed on vertical angles and throw smoke onto Screens. Defenders might hide near Elbow; Rafters; or at the back of the site, so don’t get cocky. Check all those sneaky angles.
Once you’ve secured A, plant the Spike in the back corner or on the Heaven side of the box for an unobstructed view of anyone daring to defuse. Time to send the opposition back to defender Spawn!
How To Defend On Split
Defending Split in Valorant calls for aggressive yet calculative maneuvers. The magic formula? Take control of the map and predict enemy movements. But be mindful of rotations and leverage your agents’ abilities. Just remember: Split demands an assertive play style.
Defending A Site
The epicenter of this aggression is A Site. Dispatch two agents to transform A Main entrance into a stronghold, effectively cutting down the enemy’s maneuverability from five choke points to four.
Retreating strategically is fine, because you can skirmish around A Main and keep attackers at bay. Don’t hesitate to lurk around A Screens, striking when the opposition lets their guard down.
Defending B Site
Mid control is equally essential, with Sage’s wall becoming a game-changer. By restricting access to Mid Bottom, you effectively neutralize threats from Mail and Vent. Adopt a cautious approach and patrol Vents, ensuring no attackers cross over.
This leaves five defenders guarding three choke points—a surefire migraine for attackers. On B, assign a Sentinel to B Main. This agent, backed by allies in Heaven, can hold various vantage points. Putting an OPer in Vents and another in Heaven may be tempting, but it’s not advised.
Rather, prioritize double-stacking Heaven in a potential B Split for better control. Killjoy’s Turret and Alarmbot excel at monitoring A Ramps or B Main, while Cypher’s Spycam and Trapwire provide invaluable intel.
Quick Tip
Don’t rush the choke points as a 5-stack unless it’s an Eco or Pistol round. Analyze your foes’ tactics and patterns to predict their movements. Their habitual plays are your goldmine for setting up counterattacks.
Split’s design enables quick rotations for defenders. Make use of this to bolster your defense where required. But patience is your ultimate trump card. Even if you lose Mid or A Ramps control, it only sets up another choke point for attackers. Respond tactically and slow down their push.
Best Agents To Use On Split
While meta picks on Split provoke a significant divide, many Valorant teams lean towards playing with one or two Controllers. The versatility of this map encourages abundant experimentation, meaning a variety of strategies can bring success.
The most prevalent line-ups typically include:
- Raze (Dualist)
- Jett (Duelist)
- Omen (Controller)
- Killjoy (Sentinel)
- Skye (Initiator)
Honorable mentions for their utility on this map are:
- Sage (Sentinel)
- Cypher (Sentinel)
- Brimstone (Controller)
Playing and Betting on Valorant Esports
With these tips in your back pocket, we’re confident you’ll begin to climb the Valorant ranked ladder. However, remember these strategies will vary depending on in-game conditions and the enemy teams’ setup. Be prepared to adapt your approach as necessary.
Looking for even more in-depth Valorant map guides? Master your gameplay on Pearl, Breeze, Bind, or Haven by exploring our Valorant blog.
As a premier platform, Thunderpick offers crypto esports betting with competitive odds and a diverse range of cryptocurrency payment options. New to betting? No problem! Our intuitive, next-gen interface makes placing wagers on your favorite esports teams a breeze.